Jade Prints

Bring Home The World

  • Galleries
  • Purchase
  • Book Design
  • About Us
  • Contact
  • Blog

Jul 26 2017

Day 1: At Home In Lisbon

We don’t take short breaks in Europe nearly enough so this Easter we decided to change that! Portugal has been in my sights FOREVER (hello, one of only two Western European countries that I had never been to! Finland, you are next!) It was a toss up between Lisbon and Porto for our first visit to our neighbour on the Peninsula, and in this case, Lisbon won out. We stayed 5 nights and could have stayed 5 more!

The flight on TAP Airlines was great! So short! But long enough to cross a time zone and be served our first pastel de nata. It was actually quite good so we are now super-excited to have a “real” one. We flew in right over the city but we were sat on the wrong side of the plane. From the left side though we could see Belém including the Discoveries Monument and the Torre de Belém. I even caught a glimpse of the Ponte 25 de Abril bridge but as we were right on top of it, it was just a glimpse of one of the towers.

Upon arrival we had to wait about 10 minutes for our bag – it was the third to come off! Then it was a short walk to the metro. There were two banks of machines immediately visible with a short line at each. It seemed the machines kept switching to “out of service” so we went around the corner to the kiosk in case there was a mad dash by everyone else. There was a lone machine there with no one at it so we successfully and easily bought our travel cards (0,50 € each for the cards and then 20 € on each to do Zapping). It was very straightforward and Zapping is definitely the way to go.

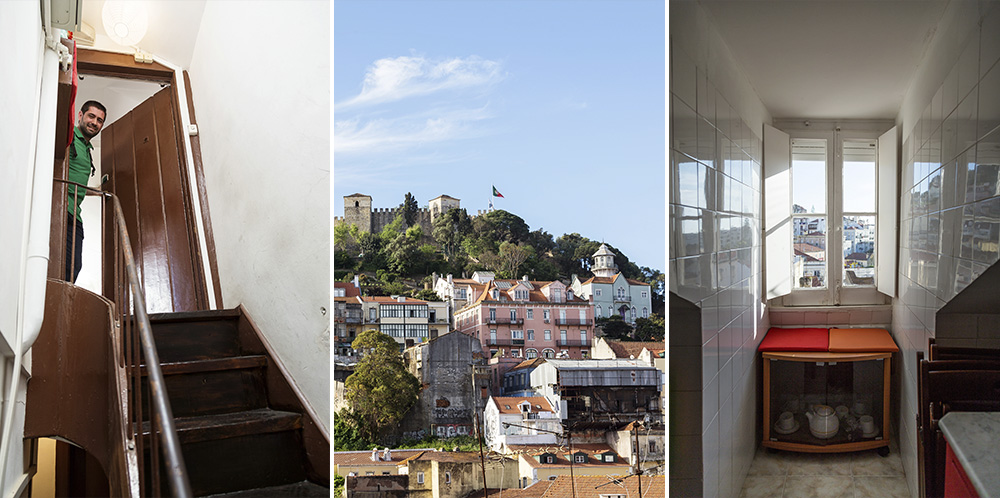
We had a couple of minutes to wait for the train and then we were off. We had to make one change to get to our station of Martim Moniz. From the station it was a short 5-minute walk to the apartment – Hobbit House Lisbon. Vasco met us and brought us up the steep four flights of stairs explaining some of the idiosyncrasies of the building. The apartment is super-cute but not one you could recommend to just anyone. They need a sense of adventure and humour, little to no luggage, and not mind stooping low to protect their head from the gabled ceilings. Loved it. It is all worth it for the view from the kitchen window!

2017-Lisbon1-01

We had a quick turnaround since it was 2 pm and lunch time! We swung by Zé da Mouraria but there were loads of people milling about waiting for a table…clearly a good recommendation. So we continued back to Martim Moniz and then up Palma to Cervejeria Ramiro (Av. Almirante Reis, 1) that everyone talks about. Amazingly there was no line so in we went. We ordered canecas (big beers) and shrimp and clams. The bread was amazing!!! With butter!! The food was delicious and fresh but we felt it was quite expensive at 11 € for each dish. I guess we are spoilt in Spain!! I can see how the place is an institution though. The tables were filled with people from all walks of life…from elderly gentlemen digging into plates of mini shrimp, to a family enjoying a day out, to tourists wondering how on earth they are going to extract all the goodness from the massive crab on their plate!! Two beers, shrimp, clams, and bread was 29 €.

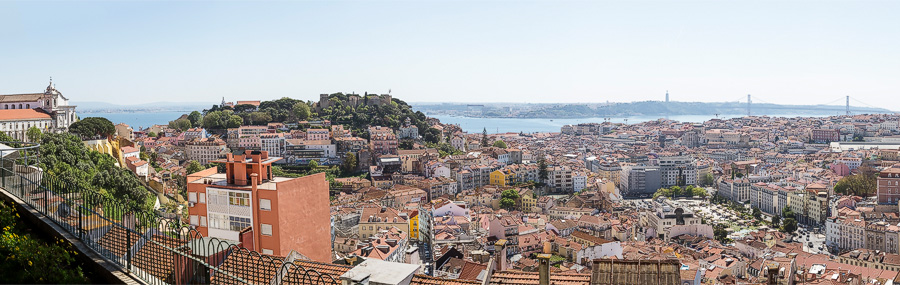
Feeling satisfied we headed out and began our first foray into Lisbon navigation. All I can say is thank goodness for Google Maps and free roaming!!! Throughout my research phase I kept a Google Map up to date with all of my points of interest and all of the restaurants and bars that sounded good. This map was worth its weight in gold as we wandered from mirador to mirador. Our first was Senhora do Monte after an impressive climb up a seemingly never-ending staircase! The view was worth it – even with what has to be Lisbon’s ugliest/most boring building in the foreground.

2017-04_Lisbon1-02

We could see the Miradouro da Graça across the way so we continued around to it. We visited the church before settling into the terrace for a well-deserved imperial (small beer). The church was different…painted walls and ceilings and the proportions seemed to be off…really small statues in huge areas. My favourite was the chapel of the santísimo which in Spanish is basically the ultimate saint. I was expecting a massive statue but it was just a wee one.  🙂

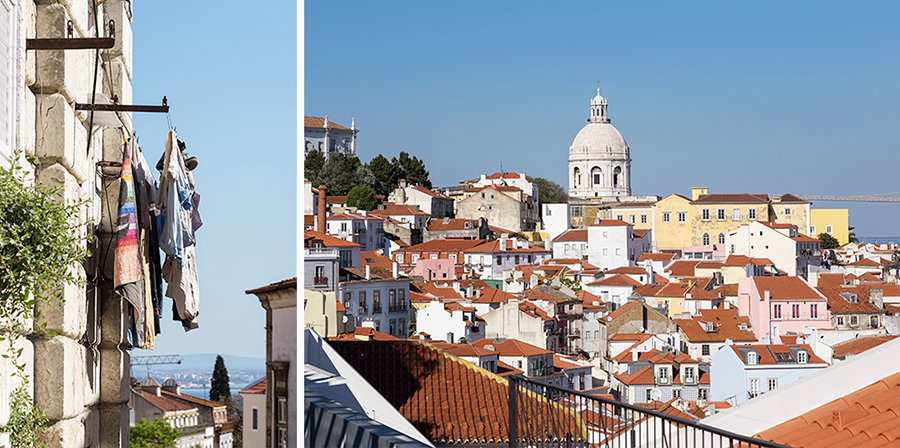
Next we continued winding our way around to the Portos do Sol and Santa Luzia miradors. These were the least impressive for me but still lovely of course. The view from the Portos do Sol was reminiscent of a fishing village with colourful buildings.

2017-04_Lisbon1-03

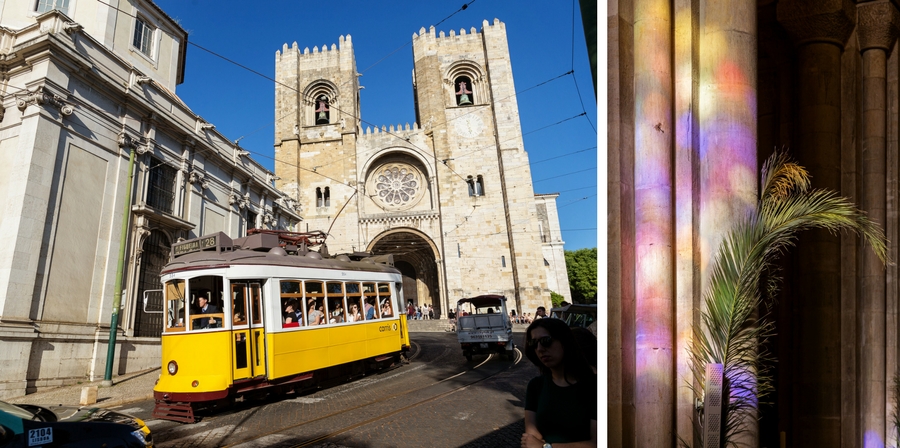
By now we had joined the tram line so we followed the tracks to the cathedral. The inside was a bit more traditional romanesque. The light was shining through the stained glass and painting beautiful colours on the palm branches that lined the central nave for the next day’s Palm Sunday services. Naturally we hung out for a bit waiting for a tram to pass in front of the cathedral for the classic postcard photo.

2017-04_Lisbon1-04

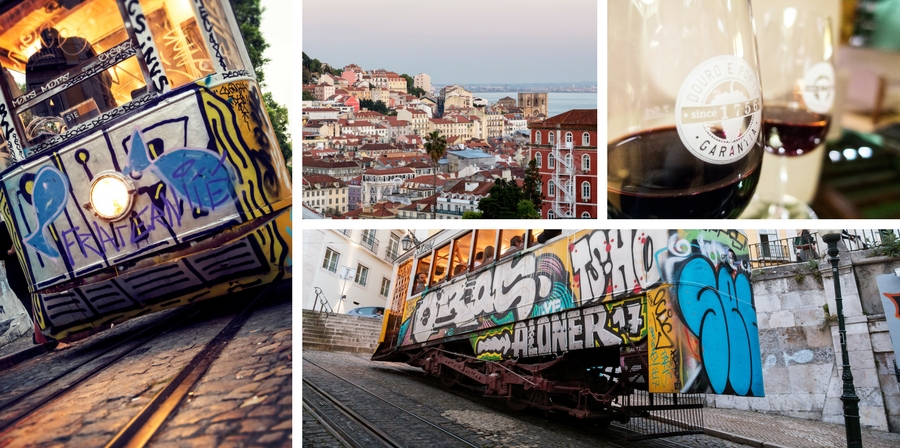
After a bit of a rest and organisation back at the apartment, we set out for our sunset viewing at São Pedro de Alcântara. We were a bit late and missed the best light but it was still great ambiance with lots of food and drink stands. The Ascensor da Glória terminates right at the park so we had fun watching it climb the hill and then proceeded to photograph it from all angles! Just across the way is the Instituto dos Vinhos do Douro e do Porto so we simply had to stop in for our first port of the holiday. Awesome!

2017-04_Lisbon1-05

Unfortunately we couldn’t linger over the port since we had dinner reservations at Carinho do Vinho (R. Nova da Piedade, 23). This wine shop turns into a restaurant on the weekend and it was simply wonderful. We had salmon, roasted mixed potatoes, baked zucchini, mascarpone mousse with oranges, wine, and port. It was all amazing. Just simple food that was prepared with love. Total was 33 € and was so much better value than Ramiro. Walking home we passed Rua da Bica (with the famous tram) and we were so glad that we weren’t staying on that street (we had an apartment short-listed there). Undeniably a great location and cool with the tram, but the street was packed with people drinking. This was 11 pm but I don’t imagine they were going home at midnight!!!! Meanwhile we were tucked in bed by midnight in our little Hobbit House!!

Looking for more Lisbon adventures? Click on the links for Day 2, Day 3, Day 4, and Day 5! Or maybe you just want the Coles Notes Version?

Written by Caroline · Categorized: Portugal, Travel

Feb 16 2017

Western Canada: A 2-Week Itinerary

To all you wanderers out there seeking beauty, nature, and adventure, look no further! British Columbia and the Rocky Mountains are all you need!! 2017 is the perfect year to explore since Parks Canada is offering free admission to all of their sites (this includes National Parks) to celebrate Canada’s 150th birthday. What are you waiting for? Get out there!!

A lifetime would be an ideal timeframe to explore this wonderland, but recognising that this is rather unrealistic, a 2-week road trip is a great place to start. We started and ended our 2,550 km circuit in Vancouver where we had a few days on either end to discover why the city consistently appears on the best places to live list. Fabulous!

12-MAP-800px

Here is the breakdown of our 15-day itinerary with distances travelled:

Day 1-3: Campbell Hills Guest Ranch, Kamloops (340 km)

Day 4: Wells Gray Provincial Park (428 km)

Day 5: Mount Robson Provincial Park (142 km)

Day 6-7: Jasper National Park (203 km)

Day 8: Icefields Parkway (260 km)

Day 9-11: Banff National Park (137 km)

Day 11 (Part 2): Yoho, Glacier, and Revelstoke National Parks (364 km)

Day 12: Driving day from Revelstoke to Lillooet (387 km)

Day 13: Duffy Lake Road & Joffre Lakes (138 km)

Day 14: Whistler (0 km!)

Day 15: Whistler to Vancouver (156 km)

12-Day1-3

No western adventure is complete without calling on your inner Clint Eastwood! So don your cowboy boots and mount up! Campbell Hills Guest Ranch is the perfect place for new and experienced riders alike. They teach natural horsemanship at the ranch so you are always in partnership with your horse. As if the natural beauty and riding adventures weren’t enough, meal times are also a highlight with camaraderie and delicious food.

Campbell Hills Guest Ranch is perfectly located: close enough to Kamloops (30 km) to be accessible but far enough away to have a feeling of solitude. The ranch offers transfers to Kamloops if you don’t have your own car.

Total driving: 400 km / 4 hr 45 min (not including the 30 km on horseback!!)

Where we stayed: Campbell Hills Guest Ranch (2 nights) & Travelodge Kamloops (1 night after the ranch)

12-Day4

Wells Gray is famous for its Helmcken Falls (4th highest in Canada) along with a host of other waterfalls and trails to be explored. Our 6 hours in the park were spent walking the trails around Helmcken Falls, Dawson Falls, and Spahats Falls, and taking in the views from Green Mountain Tower. Our long day ended in the sleepy town of Valemount perfectly poised on the border of Mount Robson Provincial Park.

Total Driving: 428 km / 5 hr 45 min

Where we stayed: Super 8 Valemount (1 night)

12-Day5

At 3,954 m Mount Robson is the highest point in the Canadian Rockies and is a sight to behold. The park entrance is a mere 20 minute drive from Valemount (or nearly 2 hours when you have a car full of photographers and Terry Fox fans wanting to pay homage to the Canadian hero at the viewing area for his mountain…..!) The spectacular view of Mount Robson at the entrance sign is one of those iconic Rocky Mountain moments. Be sure to stop in at the Visitor Centre for hiking information and another beautiful view from the back terrace. After our lovely walk to Kinney Lake we continued on to Alberta and stayed the next 2 nights in Jasper.

**Don’t forget that the clock goes ahead by one hour to Mountain Time when crossing the Alberta border.**

Total driving: 142 km / 2 hr 30 min

Where we stayed: Pine Bungalows, Jasper (2 nights)

12-Day6-7

Where to begin?? Jasper National Park is the largest National Park in the Rockies and does not disappoint. The first day was packed full of beauty with visits to majestic Maligne Lake, fascinating Medicine Lake, dramatic Maligne Canyon, and topped off with a bird’s eye view from the SkyTram Summit Trail. Our second day brought us to Mount Edith Cavell and the incredible Meadows Trail where we averaged 2 photos per minute (actual statistic!) We rounded out the day with the thundering Athabasca Falls and Sunwapta Falls. We spent the night at Sunwapta to get a head start on the next day’s Icefields Parkway adventure.

Total Driving: 203 km / 4 hr 45 min

Where we stayed: Pine Bungalows, Jasper (2 nights) & Sunwapta Falls Rocky Mountain Lodge, Sunwapta (1 night)

12-Day8

Another big player on the list of iconic Rocky Mountain experiences is the famed Icefields Parkway from Jasper to Banff (or vice versa). There is no other road like it in the world with its constant panoramas of mountains, waterfalls, glacial lakes, and if you’re lucky, some wildlife. The spectacular view of Peyto Lake from Bow Summit and a shore-side stroll at Bow Lake are not to be missed.

No trip on the parkway is complete without a visit to the Columbia Icefield Discovery Centre, which is also the starting point of the Glacier Adventure. It costs a pretty penny (a cool $90 per person in 2016) but you get to see the Athabasca glacier up close and personal and ride the gigantic Sno-Coach. Inflating the price considerably is the non-optional Jasper Skywalk attraction. We rather resented that aspect but in the end we still had fun and enjoyed the Skywalk even though it would not have been our choice to go.

Total Driving: 260 km / 5 hr

Where we stayed: The Moose Hotel & Suites, Banff (3 nights)

12-Day9-11

Arriving in Banff we were quick to realise that there aren’t enough superlatives in the English language to cover this trip! As Canada’s oldest National Park, Banff is truly a national treasure. We started with a sunset visit to Lake Louise and then a trip down the Bow Valley Parkway to the Banff town site where we stayed for 3 nights.

At this point we were happy to have a car-free day and enjoyed a shopping day in Banff capped off with a sunset soak in the roof-top jacuzzi pools at the Moose. Recharged, we tackled the Plain of Six Glaciers and Lake Agnes trails at Lake Louise. And just when we thought it couldn’t get any better, we went to Moraine Lake and had our socks knocked off – yet again. I’m still rubbing my eyes to check it was real!

Total Driving: 137 km / 2 hr

Where we stayed: The Moose Hotel & Suites (3 nights)

12-Day11

After our spectacular visit to Moraine Lake, it was time to bid farewell to Alberta and cross back into British Columbia and explore Yoho National Park. The first point of interest is actually man-made for a change! The Spiral Tunnels were completed in 1909 and allow the safe ascent and descent of trains through the Kicking Horse Pass. If your timing is right, you can see a train going through and have fun trying to determine whether it is coming or going.

Less than 20 minutes off the main road is Takakkaw Falls. Well-worth the detour, there are trails and excellent picnic facilities to enjoy. Continuing westwards, Emerald Lake is the jewel in the Yoho crown. We took a few hours to complete the lake circuit (there may have been a lake-side siesta included…!) It was the perfect way to end our time in the Rockies.

We still had a beautiful drive ahead of us as we continued through Glacier National Park and Revelstoke National Park. The Rest Area at Rogers Pass was very informative and a friendly ground squirrel thoroughly entertaining!

**The clocks change back one hour to Pacific Time at Glacier National Park**

Total Driving: 364 km / 5 hr 30 min

Where we stayed: Revelstoke Lodge (1 night)

12-Day12

This was our big driving day to Lillooet with little sightseeing. However, leaving Revelstoke it is impossible to resist a stop at the Last Spike in Craigellachie. This is the site where the ceremonial final spike was driven into the Canadian Pacific Railway back in 1885.  We also stretched our legs after Kamloops at Kamloops Lake with views over the beautiful landscape. It was amazing how much the terrain had changed in less than 400 km.

Total Driving: 387 km / 5 hr

Where we stayed: Mile-0-Motel, Lillooet

12-Day13-15

Our weather wasn’t the greatest as we set out from Lillooet to drive the famous Duffy Lake Road to Whistler. As a result we kept our eye on the goal: the Joffre Lakes hike. We took about 4 hours to hike to all 3 lakes and back. Then it was on to Whistler and a relaxing evening in the village. Our full day was spent on the trails of Whistler and Blackcomb mountains, which are joined by the staggering Peak 2 Peak Gondola. After a final relaxing morning it was time to return to Vancouver and officially finish the epic road trip with a sushi feast!

Total Driving: 294 km / 7 hr (there was a 2 hr traffic jam to get across Vancouver!!)

Where we stayed: Summit Lodge, Whistler (2 nights)

12-15-Day-Itinerary

Written by Caroline · Categorized: Canada, Travel

Mar 01 2016

The Quest for Perfect Luggage

For a while now we have been thinking of upgrading/changing our checked baggage arrangement.  We have always travelled with a checked backpack each (one big enough to fit the tripod and another carry-on size – about 70 L total).  However, the problem with backpacks is that …. they are designed for backs (!) and when your back is already occupied with a camera bag, things can get awkward.  And so began the quest to find a duffel-type bag that is comfortable to carry on a shoulder or in the hand, thus liberating ourselves of surplus straps and dangling cords.

Many hours of research and wishlists brought me to Humboldt Viajar Seguro, a travel equipment store in Madrid (Plaza Cascorro, 9, La Latina). Walking in is a bag-lover’s dream come true!  Especially when the first items on display are from the Pacsafe collection.  Pacsafe is well-known for their extra security features and quite frankly nice-looking products. We already had the 5 L Travel Safe in our travel rotation, which was worth its weight in gold for peace of mind – especially when we encountered room safes that were nothing more than a completely moveable box in the wardrobe (I’m looking at you, Chiang Mai!)

And so I finally found what I hope is the *perfect* bag (tripod size) with the Pacsafe Duffelsafe AT45.  I brought the tripod with me to make sure it fit, and I can tell you that carrying it home was much more comfortable than carrying it into Madrid!  But I didn’t stop at the Duffelsafe as there were some sales on and who can resist a sale?? We ended up expanding our camera bag repertoire (can you really ever have too many? The answer is probably yes, but maybe I’ll save that soul searching for another post!) and as of right now, I am firmly in the Humboldt and Pacsafe camp!  I can’t wait to use them all!

Chilling in Plaza Mayor with my new bag
A run-down of the purchases:

Duffelsafe AT45 (duffel bag) – at 45 L and 55 cm long, the perfect size to transport our tripod (Manfrotto 190XPROB) along with clothes, shoes, etc.

Camsafe V17 (camera backpack) – a slim backpack to carry one camera in the bottom half and ample space in the top for accessories or a change of clothes.  Laptop compartment for 13” laptop.

Camsafe V18 (sling bag with camera compartment) – a non-backpack day bag for Carlos … honestly, a bit of an impulse buy!

Camsafe V6 (top loader bag) – this goes in my carry-on/day backpack to convert it into a camera backpack.

Camsafe VP (compact camera pouch) – for either our little Canon S120 that never had a place to call home or the GoPro depending on the situation.

Once we’ve had a chance to actually use everything, I’ll come back with some reviews and recommendations.

P.S. This sounds like a sponsored post, but it’s not! We used our actual real money to buy these items.  🙂

Written by Caroline · Categorized: Gear, Travel

Mar 02 2015

Inspiration from Photoshop Week 2015

This past weekend we closed the book on another amazing Photoshop Week from CreativeLive.  For those of you not familiar with CreativeLive, it provides free workshops broadcasted live from Seattle and San Francisco. There is always the option to buy the workshop if you can’t view the broadcast or would simply like to file it away for future reference.

Photoshop Week is six days of intense Photoshop learning with 12 hours of classes per day. This year many inspirational photographers and designers graced our screens to share their secrets and hints. Even the bits that were review were driven home in a fresh way.

For example, Aaron Nace (of phlearn.com) talked about identifying distractions in a portrait and how to go about fixing them. This is something I’ve always done with our landscapes, but he presented the task in a new way and provided a little more direction to the process by physically marking up the image to ensure that nothing got left behind.

Hover over the image below to see what distractions were targeted and fixed.

Taking me a little outside my area of experience was Matt Kloskowski and his workshop on Photoshop Restoration Rescue. I haven’t really ever had the opportunity to restore old photos, but his colourisation of a black and white photo prompted me to step outside the box and do one of my own! The only B&W photos I had on hand were those from my parents’ wedding. I didn’t think it was too bad for a first attempt!  🙂  In fact, when I sent it to my parents, my mom couldn’t figure out why I was sending it to her and she asked “Doesn’t it always look like that?”  Since her memories of the day are in colour, her mind didn’t question the change.  I guess this also means that the alteration was close enough to reality!

Hover over the image below to see the original B&W image.

PSW2015_BWtoColour_after

In between all of the learning and demonstrations, we also were privy to nuggets of wisdom from these masters. Something that Chris Orwig said really resonated with me: “You’re never finished when you think you are.”  This was especially pertinent to me on that particular day since I had posted a photo to Facebook that I loved and was so happy with…until I kept working on it and realised that it was nowhere near what I wanted.  Now I’m pretty sure that it’s finished….but you never know!!

PSW2015_NeverFinished_Ayutthaya

(The plug-ins used in the above photo are RadLab from Totally Rad and Perfect Effects from On1 Software.)

Now that Photoshop Week 2015 is over, I am inspired to create new images using the different techniques that I learned and I’m already looking forward to next year!!

Written by Caroline · Categorized: Learning

Aug 30 2014

Thailand: Coles Notes Version

Needless to say, there is a lot of information buried within all of these blog posts about our trip to Thailand.  This final post serves as a one-stop-shop for the nitty gritty details of our hotels and excursions that we did.  Our long-haul flights were with Emirates and domestic flights were with Bangkok Airways in and out of Samui.  No issues with either!


Hotels:

Bangkok:  Casa Nithra, 2100 THB per night (Superior Room), highly recommended

Ayutthaya:  Baan Kong Homestay, 900 THB per night (Standard Bungalow), highly recommended (no website, but available on booking sites)

Sukhothai:  Thai Thai Sukhothai, 1600 THB per night (Superior Bungalow), highly recommended

Chiang Mai:  Sakorn Residence, 1200 THB per night (Superior Room), recommended (misses being “highly” due to distance from the Old Town, but the river location has its merits as well.)

Koh Samui:  Hotel Pelegrin, 800 THB per night (fan) or 1400 THB per night (A/C), recommended

Koh Tao:  Ko Tao Resort, 1800 THB per night (Deluxe Room), I would look for another hotel before staying here, but if it was the only option, I would stay again.  We really struggled to find a hotel on Koh Tao since the majority of the review scores were average at best.  Luckily we didn’t have to choose a beach since we had found IHASIA dive school first so that narrowed down the hotel search.


Excursions:

Elephant Nature Park:  Pamper a Pachyderm program, 6000 THB per person, highly recommended

Cooking Course in Chiang Mai:  Thai Farm Cooking School, 1300 THB per person, highly recommended – make sure you’re hungry!

Ang Thong Marine Park:  100 Degrees East, 4500 THB per person, highly recommended

Scuba Diving:  IHASIA, 7000 THB per person, highly recommended for Spanish speakers.  There were also groups learning in English but our group’s experience was with Spanish tuition.  IHASIA is run by Spaniards and the vast majority of the students were Spanish.

Flying Trapeze:  Goodtime Adventures, 950 THB per person, highly recommended.  Just be aware that you will use muscles you never knew existed and will likely be sore the next day (and in my case sore for almost 2 weeks!!  I couldn’t stretch my arms back entirely until 2 weeks later….but so worth it!)


General Observations:

  1. In general everyone was really friendly – except on the islands.  The majority of the Thai people we encountered on Samui and Tao were not very nice at all, which left us with a bit of a sour taste.  This was particularly evident at Ko Tao Resort…the housekeeping staff were all quite pleasant but the people working reception were indifferent to the guests (at best).  All of the expats though were super-friendly.
  2. The food was all good, but we felt that it got a bit repetitive by the end.  Non-spicy options were quite limited for Virginia (pad thai, fried rice, pad see ew, and chicken with cashew nuts were the staples!)  Oddly enough, we also missed eating with chopsticks!
  3. Transportation worked well….our buses, trains, and ferries left on time but were 40 minutes late arriving (coincidence?) while our 2 flights were bang on time.
  4. Temple are everywhere!!  Easy on-off shoes make life easier!  Capri pants for women were long enough in most cases with exceptions being the Royal Palace in Bangkok and Bhubing Palace in Chiang Mai.
  5. Generally we found everywhere to be organised and safe.  We were in Bangkok at a holiday time so it was quite empty.  It wasn’t until we had our final night there at the end of the trip that we experienced the dreaded traffic jams that it is famous for.
  6. While in Bangkok, always use the taxi meter.  However, if it proves impossible, just remember that even though you are getting ripped off, it is still infinitely less than what you would pay at home! Another thing to watch out for is the meter that runs way too quickly.  This happened to us going to the airport for our flight home.  When the meter was already at 50 baht after 10 meters, I just pointed out that there must be something wrong and the driver reset it.
  7. And finally, if your elephant guide offers you rubber boots, TAKE THEM!!!  🙂


Thailand-Route-Map-Tickets

Written by Caroline · Categorized: Thailand, Travel

  • « Previous Page
  • 1
  • 2
  • 3
  • 4
  • …
  • 10
  • Next Page »

Copyright © 2023 · Altitude Pro Theme on Genesis Framework · WordPress · Log in